As the leader in Android phone brands, Samsung's workmanship has been in the world's top level. Among them, the A series is particularly prominent. Because it is to ensure low prices, while still maintaining excellent workmanship. GalaxyA3, A5, A7 has a waterproof and dustproof case, which A7 will also increase the display screen to 5.7 inches. As for the configuration, A5 and A7 will use the Samsung Exynos 7880 processor, with 3GB RAM, while the A3 is used Exynos 7870 processor, with 2GB RAM. In addition, the three new machines are equipped with positive fingerprint recognition, support for 256 GB micro SD card, and equipped with the new Android 7.0 system. Of course, Samsung A8 and A9 are no less, I will not be introduced in detail.
Samsung A series is worth buying. And we can not avoid the accidental deletion of important data in the phone. When this happens, what should we do? How to restore the deleted data from Samsung A series?

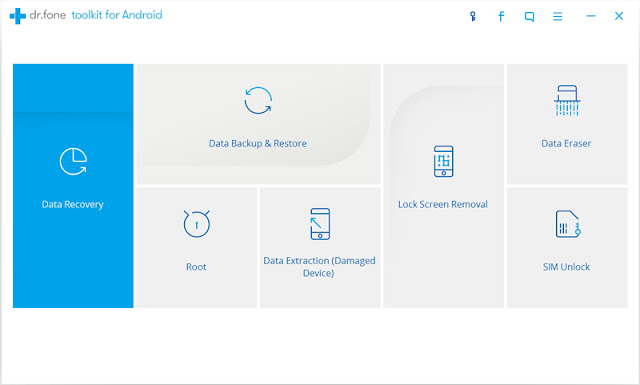
To restore the deleted data in the Samsung A3/A5/A7/A8/A9, you have to mention this data recovery software--- Dr.Fone for Android. It can be compatible with more than 6 thousand Android devices, involving a large number of brands, including Samsung, HUAWEI, LG, ZTE, HTC, Motorola, SONY, etc.. Recoverable data is not limited to contacts, photos, text messages, videos, music, call history, WhatsApp and other documents can also be restored. Whether your phone data is deleted or lost due to other circumstances and needs to be restored, it can almost be solved.


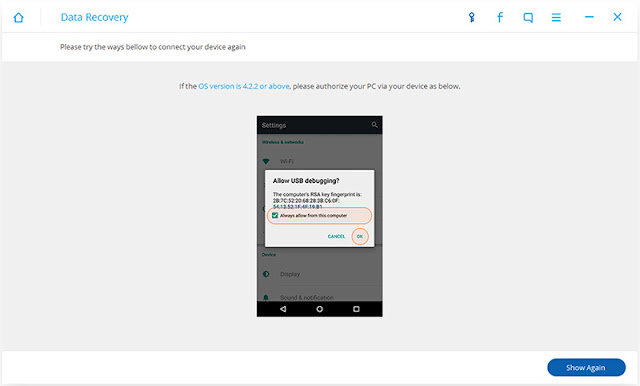
Step 1. Download Dr.Fone for Android on your computer. After installing and running it, you will find the main interface will appear all the features, find and click on "Data Recovery". Then, use your USB cable to connect your Samsung A3/A5/A7/A8/A9 to your computer. In the connection, the program will pop up a window, you need to open the phone USB debugging, and otherwise, you will not be able to continue to the next step.
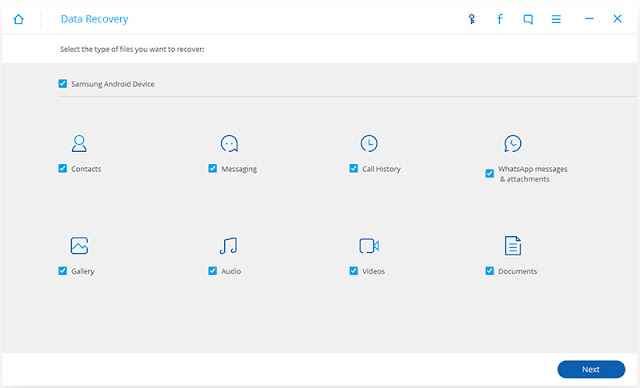
Step 2. Then, check the data items you need to restore. As you can see, by default all items are checked. You can just select the type of data that you'd like to recover. And then click "Next" to continue the data recovery process.
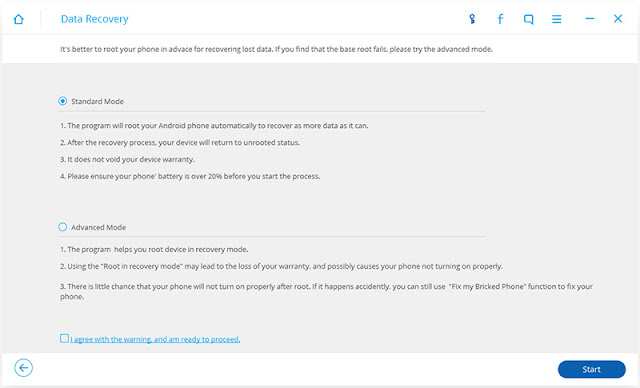
Step 3. You also need to select the scan mode for your phone data. "Standard mode" and "Advanced mode" for your choice. If you do not know which one to choose, then I recommend "Standard mode". Because this mode is work faster. After selecting the mode, click "Start". The scanning process will take you a few minutes.
Note: There might be a Superuser authorization appearing on your device during the scan. If you get it, click "Allow" to continue. If not, just skip this step.
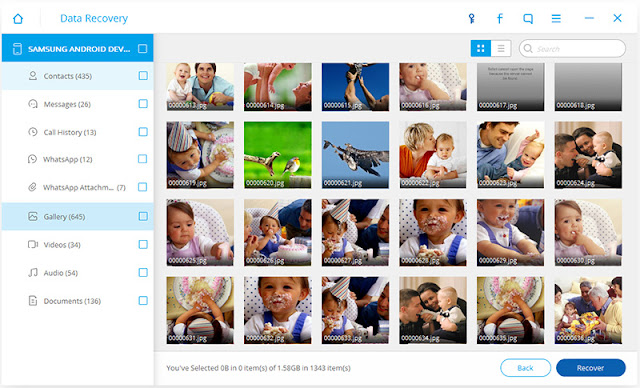
Step 4. When the data on the phone is scanned completely, the data will be displayed in the main interface. You can preview them one by one. You can also type file name in the search box to search for. Then, find and check the file you need to restore, click "Recover".
Restore Deleted Contacts from Samsung A3/A5/A7/A8/A9
Recover Deleted Photos from Samsung Galaxy A3/A5
Samsung A series is worth buying. And we can not avoid the accidental deletion of important data in the phone. When this happens, what should we do? How to restore the deleted data from Samsung A series?

To restore the deleted data in the Samsung A3/A5/A7/A8/A9, you have to mention this data recovery software--- Dr.Fone for Android. It can be compatible with more than 6 thousand Android devices, involving a large number of brands, including Samsung, HUAWEI, LG, ZTE, HTC, Motorola, SONY, etc.. Recoverable data is not limited to contacts, photos, text messages, videos, music, call history, WhatsApp and other documents can also be restored. Whether your phone data is deleted or lost due to other circumstances and needs to be restored, it can almost be solved.
Step 1. Download Dr.Fone for Android on your computer. After installing and running it, you will find the main interface will appear all the features, find and click on "Data Recovery". Then, use your USB cable to connect your Samsung A3/A5/A7/A8/A9 to your computer. In the connection, the program will pop up a window, you need to open the phone USB debugging, and otherwise, you will not be able to continue to the next step.


Step 2. Then, check the data items you need to restore. As you can see, by default all items are checked. You can just select the type of data that you'd like to recover. And then click "Next" to continue the data recovery process.

Step 3. You also need to select the scan mode for your phone data. "Standard mode" and "Advanced mode" for your choice. If you do not know which one to choose, then I recommend "Standard mode". Because this mode is work faster. After selecting the mode, click "Start". The scanning process will take you a few minutes.

Note: There might be a Superuser authorization appearing on your device during the scan. If you get it, click "Allow" to continue. If not, just skip this step.
Step 4. When the data on the phone is scanned completely, the data will be displayed in the main interface. You can preview them one by one. You can also type file name in the search box to search for. Then, find and check the file you need to restore, click "Recover".

Related Articles:
Recover Deleted Photos from Samsung Galaxy A3/A5
Comments
Post a Comment